How to Detect OAuth Access Token Theft in Azure

Stealing access tokens to gain access to a user’s account in Azure is a technique that’s been actively used by threat groups over the past few years. I’ve observed this technique in several engagements across the past few years from Chinese APT groups. Generally, this is done through a spear phishing / phishing email with a link that requires a user to grant access to a malicious application through OAuth’s authorization code flow. This enables the attacker-controlled application to access the user’s data.

I’ve broken the blog into two components:

  • Attack overview
  • Detection methodology


ATTACK OVERVIEW
The attacker will register a malicious application and generate a phishing link in an email that takes a user to a page that looks like the image below. This will generally show information including the app name (in this instance it’s listed as “evilapp”) – whether the app is verified / unverified and then the option to accept or not. 


Just a side note: in almost every instance, the threat actors are not obtuse enough to name it “evilapp” – I usually see them give applications a very Microsoft-sounding name like “Microsoft OAuth Application” or something random like this (no shade intended). 

At this point, when the user presses “accept” what happens is:
  • The user authenticated with the application
  • Access token is now returned to the malicious attacker’s application via the re-direct URI 
In this instance, I’ve gathered the user “inversecos” access token along with the refresh token. The refresh token is what’s used to request new access tokens without requiring the victim to re-authenticate.


DETECTION METHODOLOGY

Step 1: OAuth Redirect Link
A quick review of a user’s browsing history will reveal all malicious OAuth URLs visited from a phishing email. If you look closely at the browser URL, you will see the malicious redirect link where the OAuth token will be directed to a malicious domain (where the threat actor’s application is running from). 

For the sake of “visibility”, I’ve pasted the full malicious URL below. Please note that in most of the instances where I have observed this, the combination of reviewing browsing artefacts followed by reviewing the URL and then reviewing audit logs have revealed the full attack chain and what the threat actors did:

https[:]//login.microsoftonline.com/common/oauth2/v2.0/authorize?client_id=6baa7a70-af41-4f1b-9b0f-52ab388a4c09&response_type=code&redirect_uri=http%3A%2F%2F127.0.0.1%3A5000%2FgetAToken&scope=User.Read+offline_access+openid+profile&state=9dec50b3-e211-4c88-9a34-4046e239c159

The main areas to observe in that URL string above are:
  • Client_id:  This is the client_id of the malicious application that the attacker has set up in the attacker’s tenant (or it could even be created in YOUR tenant which is more insidious)

  • Redirect_URI: This is the URL where the application is being hosted and run from. For this example, I ran this from my localhost hence the URL of “http://127.0.0.1:5000/getAToken”. However, in an attacker instance, this will generally show a malicious domain.

  • Scope: These are the API permissions that the attacking application is getting your consent to grant. In this example, only one permission is being requested “User.Read” 
From the attacker’s perspective this is how they register a malicious application. Please note here that there’s two attack vectors an attacker can take – they can register a malicious application within your organisation’s tenant, or they can do this inside their own malicious tenant and select this option of “Accounts in any organizational directory (Any Azure AD directory – Multitenant)”. 


Step 2: Review granted permissions
It’s important at this step you review all the permissions granted to the malicious application. Here is the official Microsoft documentation: https://docs.microsoft.com/en-us/graph/permissions-reference. In my example, I only granted one permission, however these are some you should look out for:

  • User.Read – Allows the application to read the profile of a user and basic company information

  • User.ReadWrite – Allows the application to read and update user profile information

  • User.ReadWrite.All – Read and write to all users full profiles. This can be used to create, delete, and reset user passwords.

  • Mail.ReadWrite – Allow application to read and write emails 

  • Calendars.ReadWrite – Allows the application to read and write to calendar

  • Files.ReadWrite – Allows the application ability to read and write files

  • User.Export.All – Application can request to export a user’s personal data 

Step 3: Audit Logs 
Reviewing the Azure audit logs will reveal THREE log entries that you need to take note of (see below). These will happen in a succession once a user grants permissions to the malicious application.

Hunt 1: Malicious delegated permission
This is the first event you will see when you perform the hunt. Look for the following details:
  • Category: ApplicationManagement
  • Activity: Add delegated permission grant
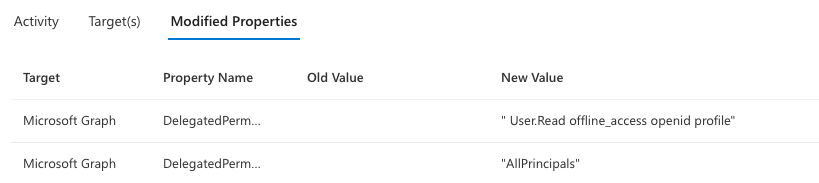
  • Target Property Name: Look for the permissions that were granted. In my instance you can see it was the “User.Read” permission.

Hunt 2: Malicious app role assignment 
To hunt for the initial granting of permissions to the application, look for the following details:
  • Category: UserManagement
  • Activity: Add app role assignment grant to user
  • Status: success
  • ObjectID: <Malicious application Object ID>
  • Target Display Name: <Malicious application name>

Hunt 3: Malicious application consent
Finally, the entry that shows the actual application consent can be seen by looking for the following entry in the audit log:
  • Category: ApplicationManagement
  • Activity: Consent to application
  • Initiated by (actor): Look for the malicious application Object ID
  • Target Display Name: Look for the malicious application name
  • Modified Properties: Look for the ConsentAction.Permissions and confirm the permissions consented by the user to the malicious application. I’ve highlighted here in purple the permission of “User.Read”. 

Step 4: Azure Sign-in Logs 
Finally, review the Azure sign-in logs for logons into a user account coming from an application. This should be done after step 3 to avoid false positives. In step 3, you will be able to gather the malicious application name along with the Object ID, this can be used to then filter through the sign-in logs.   In my instance this happened once:


This is what you look for:
  • User sign-ins (interactive)
  • Application: Malicious application name 
  • User ID: The client ID of the malicious application

Happy hunting UwU 

REFERENCES


Comments

Popular posts from this blog

Forensic Analysis of AnyDesk Logs

Successful 4624 Anonymous Logons to Windows Server from External IPs?

How to Reverse Engineer and Patch an iOS Application for Beginners: Part I