Insider threats are unfortunately a real and active threat.
The forensic investigation of a suspected insider follows a different approach in methodology than the classic methodology for investigating threat actors. The main difference between insider jobs and other jobs is the fact that clients usually want a timeline of both activity around the “malicious action” and also a timeline of “legitimate” activity leading up to, during and post the malicious actions to remove reasonable doubt that it was somebody else. During an insider job, artefacts that show system wake/hibernation, or artefacts proving a user opened something on their taskbar are just as important as the malicious activity itself depending on the client needs.
For these cases, analysts should *consider* create TWO timelines depending on the client needs and the nature of the incident:
- One timeline for malicious activity
- One timeline capturing ALL relevant activity showing what the user was actively doing since being identified as an insider
Why two timelines? Because once an employee is identified as an insider, information access becomes a key concern. Also make sure you take note of any corporate policies the client has because this might change what you choose to exclude/include in the timelines.
Generally, clients and forensic analysts assume all malicious activity is done by an outsider… but this is not always the case, I have worked full domain compromises caused by insiders with credential dumping and the other usual TTPs. Now in some instances it’s clear very quickly that it’s not an insider, but in other cases, you will realise when performing the analysis, that it doesn’t appear to be an outsider. The nature of the investigation will obviously change.
To give some examples of malicious insider jobs:
- Malicious insider decides to sell credentials for money leading to a FULL domain compromise (I have seen this happen more than once!)
- Malicious insider exfiltrates sensitive code from the organisation or issues changes to the code base
- Malicious insider tries to frame another employee/colleague for malicious action
- Malicious insider executes malware on various systems
- Employee gets a new job and exfiltrates files (cloud or removable device) NOTE: I do not work these cases personally AND THIS BLOG IS NOT ABOUT THIS KIND OF INCIDENT.
This blog is the high-level methodology I follow when approaching cases like this. I will also share some ideas for artefacts that can give you some quick wins when it comes to figuring out what happened and some good artefacts to frame the activity around the user.
I don’t want to turn this into a full forensics blog about every artefact on the planet so it will only cover some key artefacts to give you an idea of what to focus on when demonstrating the user was “active”.
HIGH-LEVEL METHODOLOGY
As an investigator, your job is not to jump in assuming the suspected human is behind the activity. Your job is to remain 100% unbiased and let the evidence do the story telling. At the end of the day, the focus of the job is to slowly stack evidence (if there even is any) so you can gradually eliminate the probability that it was somebody else. When working on a suspected insider threat case, the context around the activity that flagged suspicion is the key focus of the case.
The investigation methodology I follow for insider cases is guided by four key questions:
- How was the device accessed around the suspected behaviour?
- Where was the user/device when this occurred?
- Was the insider active on their system?
- What did the user do?
I believe that prior to any investigation, you need to set up a plan for analysis, with highest value targets placed first for analysis. This eliminates time spent, especially during time-critical cases where clients want an answer because it impacts their BAU / remediation.
I will not be covering lateral movement as there’s plenty of articles about that and the methodology doesn’t differ from investigating a threat actor.
1. HOW WAS THE DEVICE ACCESSED AROUND THE SUSPECTED BEHAVIOUR?Purpose: To answer one key question that clients will always ask, “was the user’s credentials compromised or was it the user themselves? “
Step 1: Get the user account the malware/activity was executed under
The first most obvious approach is to figure out what context the activity/malware was executed under. I point you therefore to my favourite THREE artefacts for this:
- SRUM
- ActivitiesCache.db
- Prefetch / Amcache
SRUM
For a high-level overview of SRUM please refer to my tweet below (I will not cover what this artefact is in this blog post). This tweet explains what the artefact is and how to perform the analysis.
I like SRUM for this because it shows the following key information:
- What application executed?
- How long the application ran for (execution time)?
- WHO or what SID it was running under?
Specifically, I would focus on pulling the data from the App Timeline Provider data contained within SRUM. The location for SRUM is C:\Windows\System32\sru\SRUDB.dat.
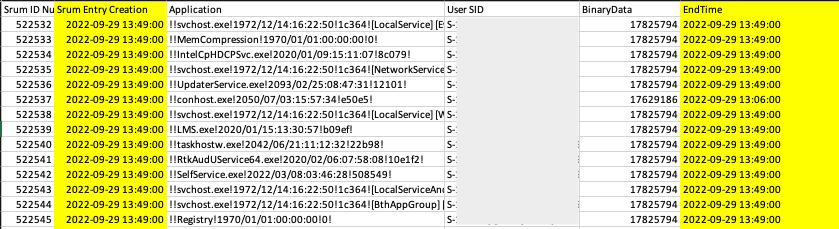
When you parse out SRUM, focus entirely on the SID and make sure to timeline the START and ENDTIME of the application that’s in question.
ActivitiesCache.db
Now we know what SID this “malware” or whatever was being run was being run under. I would double down on this by providing a secondary artefact to corroborate and prove this piece of information. You can pull this from the corresponding ActivitiesCache.db for the user. This file is located at %userprofile%\appdata\local\ConnectedDevicesPlatform folder. Focus specifically on activity type 5 as this correlate to execution.
I would also take some time to parse this into a full timeline of execution and user activity around the time of suspected activity. This will help you provide the client extra context around “what the user was doing / up to” around the time of the suspect activity.
For example, for one of the cases I worked, the user claimed they were not on their laptop, but it was clear they were browsing outlook and looking at chrome. You can ALSO pull this data from SRUM. I like to double up on artefacts just because I’m paranoid AF.
Prefetch/Amcache
I would also prioritise parsing out Prefetch and Amcache for this just as a third artefact to prove execution. This should not take long at all to parse out. This is what prefetch looks like in the folder %systemroot%\Prefetch. I’m not going to dive too deep into this because there’s a lot of information about what this artefact is and how to analyse it. You don't have to opt for these artefacts... you can go for registry keys like UserAssist or whatever other execution artefact you like.
Step 2: Figure out HOW the user logged into the system around the time of malicious activity
A quick fire way to answer this question is to timeline all the logon events around the time of compromise and identify if ALL the logons around that point were physical / remote.
It’s important to figure out if any remote access occurred on the system. In most of the true positive insider threat cases I’ve worked, no remote access has typically occurred, and the activity took place within a normal hands-on-keyboard user-session. Most insiders (and I am not sure why) tend to use their work laptops assuming there’s no tool monitoring what they’re doing because they assume their activity falls under the “normal” activity… which I guess in most instances isn’t a false assumption.
Logon Events
I don’t want to ramble too much about this because it’s documented to death, but focus on the following EVTX files and don’t forget about corresponding registry keys ;)
- Security.evtx (Logon type 2, 7, 11)
- User Profile Service Operational.evtx (EventID 2, 3)
- Microsoft Windows TerminalServices RemoteConnectionManager/Operational.evtx
- Microsoft Windows TerminalServices LocalSessionManager/Operational.evtx
At this point you should be able to answer the question of “who was sitting in front of the system when it happened”. Based on the activity timeline you created in step 1 and the logon data, you should know:
- Was the access to the system physical or remote?
- What were they doing around the time of the suspect activity?
System Hibernation
Now, for this very interesting case I worked, the suspected insider claimed it was a piece of malware that ran the malicious files and they were NOT physically active/present on the system. For this, you just need to look at a few registry artefacts but more importantly, the artefact that answers this in one question is the System.evtx event ID “1”. Focus on the source “Microsoft Windows-Power-Troubleshooter”. It will log the hibernation and wake time of the system.
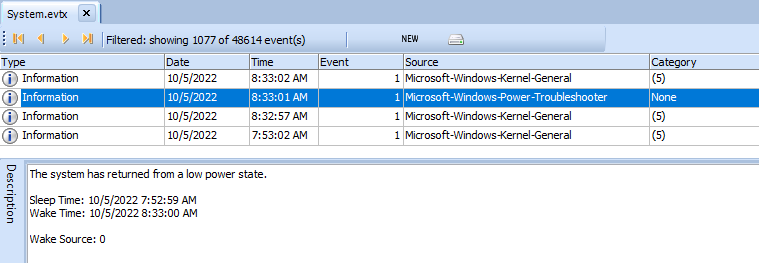
This is an example of a where hibernation and logon events lined up perfectly right before the user executed the malware. I've removed the timestamps and other information to make it legible.
2. WHERE WAS THE USER/DEVICE WHEN THE ACTIVITY OCCURRED?
Purpose: Clients usually want to know what network the system was connected to i.e. did this happen in the office or on their home network.
At this point you should have a clear idea if the activity happened locally/remotely and if the system was active/not active and what was happening. I worked a case recently where malware was executed, and the client suspected that an employee had performed this action inside the office. The employee said to the client that they were not in the office when it occurred. The artefacts below will prove to you that the employee WAS in the office physically:
- Network SSID Artefacts (SRUM, Event Logs, Registry)
SRUM – SSID Artefacts
Once again SRUM comes in as the GOAT for insider cases. The network connectivity usage logs under SRUM stores valuable information around what network SSIDs the user connected to and the DURATION of how long they were connected to that network. Sexy right? It also stores information around the connection type. The “L2ProfileId” is the name of the WiFi SSID.
Microsoft Windows NetworkProfile Operational.evtx
This event log also stores information around network SSIDs the user connected to and what times it occurred. I would filter by event ID 10000 and focus on the “name” and “description” values.
Microsoft Windows WLAN AutoConfig Operational.evtx
This event log also stores information around networks that the user connected to – specifically event ID 11004 and 11005. The relevant value is stored under the “Network SSID” value.
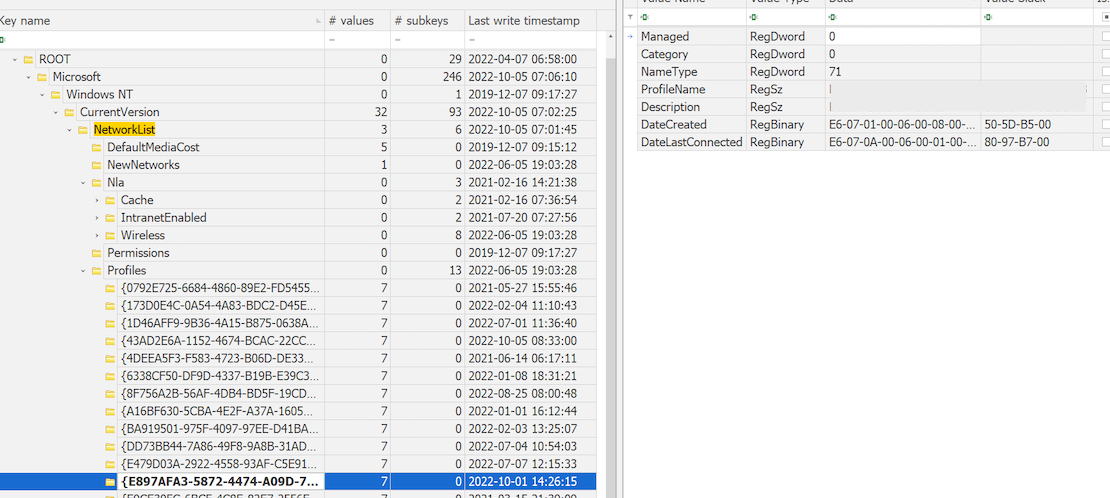
SOFTWARE Hive
The software registry also stores a list of the first and last network connections under the “NetworkList” key. This will store so much information like the SSID, MAC and times around when they first and last connected to the network.

3. WAS THE USER ACTIVE ON THE SYSTEM?
Purpose: Clients generally like a timeline of what the insider was doing around the time of malicious activity i.e. they were simultaneously browsing Teams, Outlook
At this stage you should’ve been able to demonstrate that the insider was physically active on the system – now you want to create a timeline that includes NON-malicious activity to show they were using the system. I like to create two different timelines – a timeline of malicious activity only, and a timeline that captures the full user “story”.
This is a MASSIVE topic to cover because depending on the type of insider activity, the artefacts you analyse will vary. But to demonstrate my point, I will give you an obvious high-value artefact that highlights the purpose of this dot point. There are many artefacts that can be used here so I would just perform forensic analysis as per usual taking note of any interesting findings.
Feature Usage Registry Key
The registry key “Feature Usage” stored under “NTUSER.DAT\Software\Microsoft\Windows\CurrentVersion\Explorer\FeatureUsage” is a very interesting artefact that will track what a user is doing in direct relation to the task bar i.e. a user opening an application in the taskbar that has been minimised.
It tracks many interesting things – the two specific ones to this example are:
- AppLaunch – tracks applications launched from the task bar that are pinned
- AppSwitched – Shows when a user is physically switching from one application to another in the task bar (also proves execution)

4. WHAT DID THE USER DO?
This is the part that joins insider cases with normal analysis. The only difference is you should build two timelines:
- One timeline that covers only malicious activity undertaken
- Another timeline that captures what else the user was doing SINCE being an insider
Forensic artefacts to consider at this point are other artefacts you would usually analyse in an investigation… just naming a few from the top of my head:
- Shellbags – what folders the user was viewing
- LNK files – what the user was accessing
- Jumplists – what the user was viewing
- Browser history – what the user was looking at if a browser was active
- Other artefacts you would analyze
I would also take note of any “defence evasion” techniques a user may deploy:
- Configuration changes (reverting states i.e. in Azure Audit Logs)
- File deletions of any kind
- Deletion of conversation records on Teams / Outlook etc
Regardless of it being an insider, opportunistic threat, or APT, my favourite artefact for this is getting the timestamps of all deleted files around the time of compromise – so $J becomes your best option.
If you don’t know how to perform this, check this tweet I made about it:
Happy investigating UwU <3


Comments
Post a Comment