An organisation’s cloud storage is a prime target for attackers looking to identify sensitive information for exfiltration. Depending on the settings set on Azure Storage accounts, companies could be unknowingly exposing their containers / blobs to the internet for direct access. Azure Storage is Microsoft’s solution for data management and storage in the cloud. Depending on the permissions set on an organisation’s storage account and if the access keys / shared access signature (SAS) URIs are uncovered by an attacker – attackers can connect to an organisation’s storage account and pull the data stored.
This blog post explores the methods an attacker can use to interact with Azure Storage accounts to pull/access sensitive data and what to analyse to detect these attacks. The tools I used to perform this include:
Background on Azure Storage
One of the hardest parts of learning any new topic in cybersecurity is the various names that vendors prescribe. As such, this little section is a primer on Azure Storage and what the various words mean in Azure. I hope this can give a little more context for the rest of the blog post!
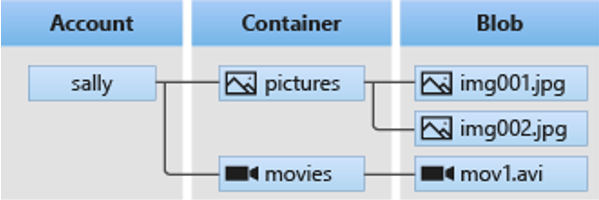
Azure Storage is primarily handled by an Azure Storage Account. These accounts are used to access services such as blobs, files, tables and queues. The screenshot below taken from Microsoft’s documentation highlights the general relationship. In short, a storage account exists – in this instance “Sally”. Sally has two containers – one for pictures and one for movies (think of this like a directory or a folder). Within these folders there are files or “blobs”.
From the attack perspective, an attacker would want to know what containers exist and subsequently, what blobs exist within that container. This will allow the attacker to download / enumerate / access these files.
Every single time a storage account is created, there is a default base address which is created that allows you to interact with the storage account’s containers and blobs:
https://<YOURSTORAGEACCOUNTNAME>.blob.core.windows.net
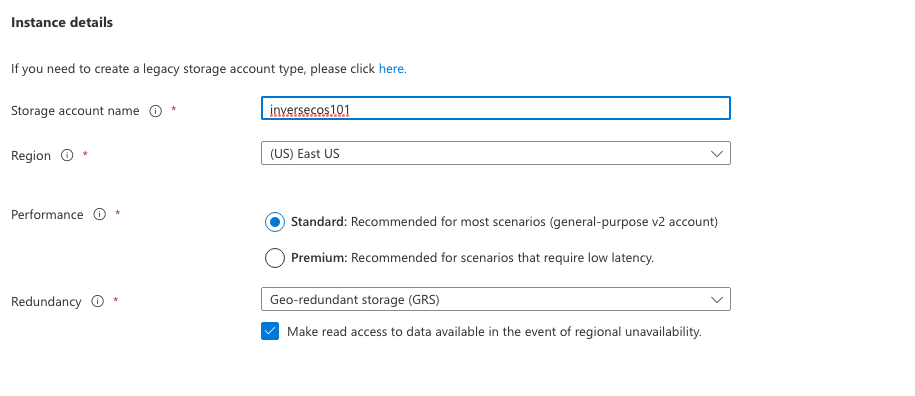
For the sake of this blog post, I created a storage account I named “inversecos101” hence the endpoint I will be using is:
https://inversecos101.blob.core.windows.net
Using this URL you’re able to interact directly with container and blob objects depending on permissions set. The general structure is:
https://inversecos101.blob.core.windows.net/container_name/file_name
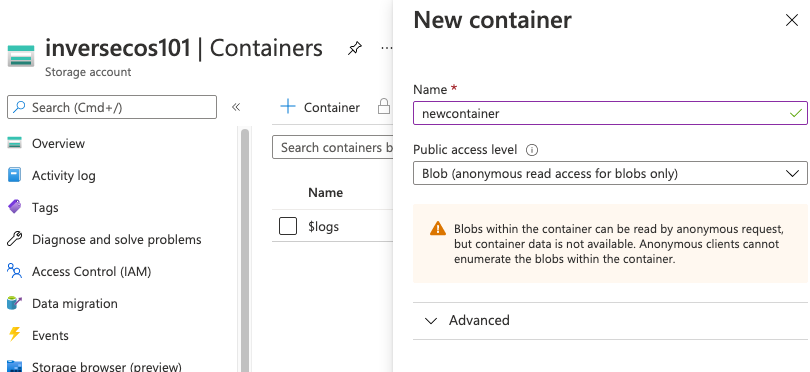
The screenshot below shows my storage account creation:
Once you create your storage account – you will need to create some containers to hold the data. Each of these containers need to have a “Public access level” configured. There are three options here:
- No public read access
- Public read access for blobs only – this requires that an attacker KNOWS the object URL to access it. This is the setting I have chosen for my storage account.
- Public read access for container and blobs
For an attacker to access and download the files stored within this container, an attacker needs to know the name of my container and the names of the files inside that container.
The next step for me is to upload a file into my “newcontainer” container. For this, I chose to upload a random image called “hacked.png”.
This is what my “hacked.png” file looks like:
ATTACK FLOW
For an attacker to access, download and iterate through files within a container (with Blob public access level) this is the attack method:
Step 1: Find out the storage account name
Using open-sourced enumeration tools, attackers can enumerate Azure subdomains belonging to an organisation to reveal interesting information. What you’re looking for in this instance is a reference to a subdomain with the URL structure of “<Storage_Account>.blob.core.windows.net”. This will give an attacker the name of the storage account.
Step 2: Find out the Container name
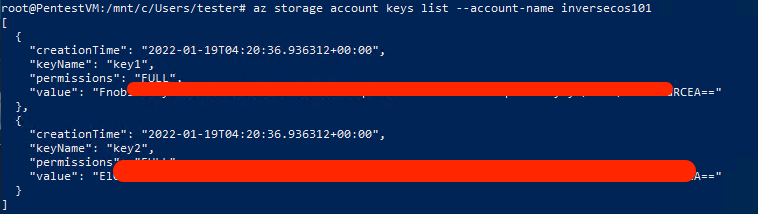
Due to the permission levels set on the container, the attacker needs to know the container name and / or the Storage Access Key to access the data. For the sake of this blog post, let’s say that the attacker has already gained access into the Azure environment during their attack and are now in the final stages of data collection. Using an account with sufficient permissions, an attacker can use the Azure CLI to attain the Storage Access Key for the storage account.
In the screenshot below you can see there are two keys that are returned. Both can be used by the attacker – for the sake of ease, I stuck to using the first key.
Step 3: Find the Storage Access Key
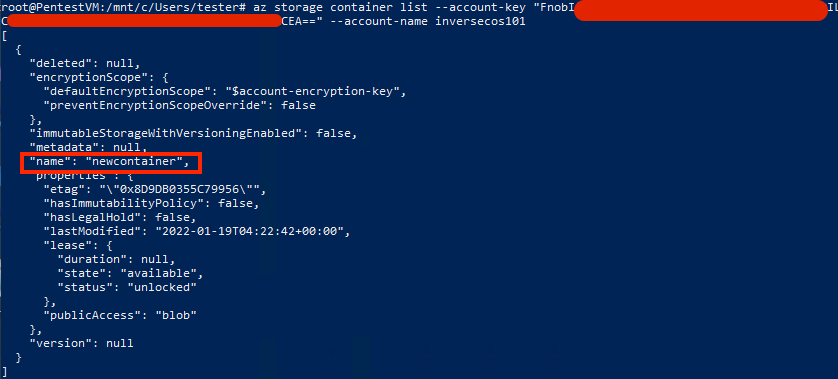
The next step is to use the Storage Access Key to enumerate the containers that exist for the Storage Account. This can also be done using the Azure CLI. As you can see this returns the name of the container “newcontainer” which was the name of the container I created.
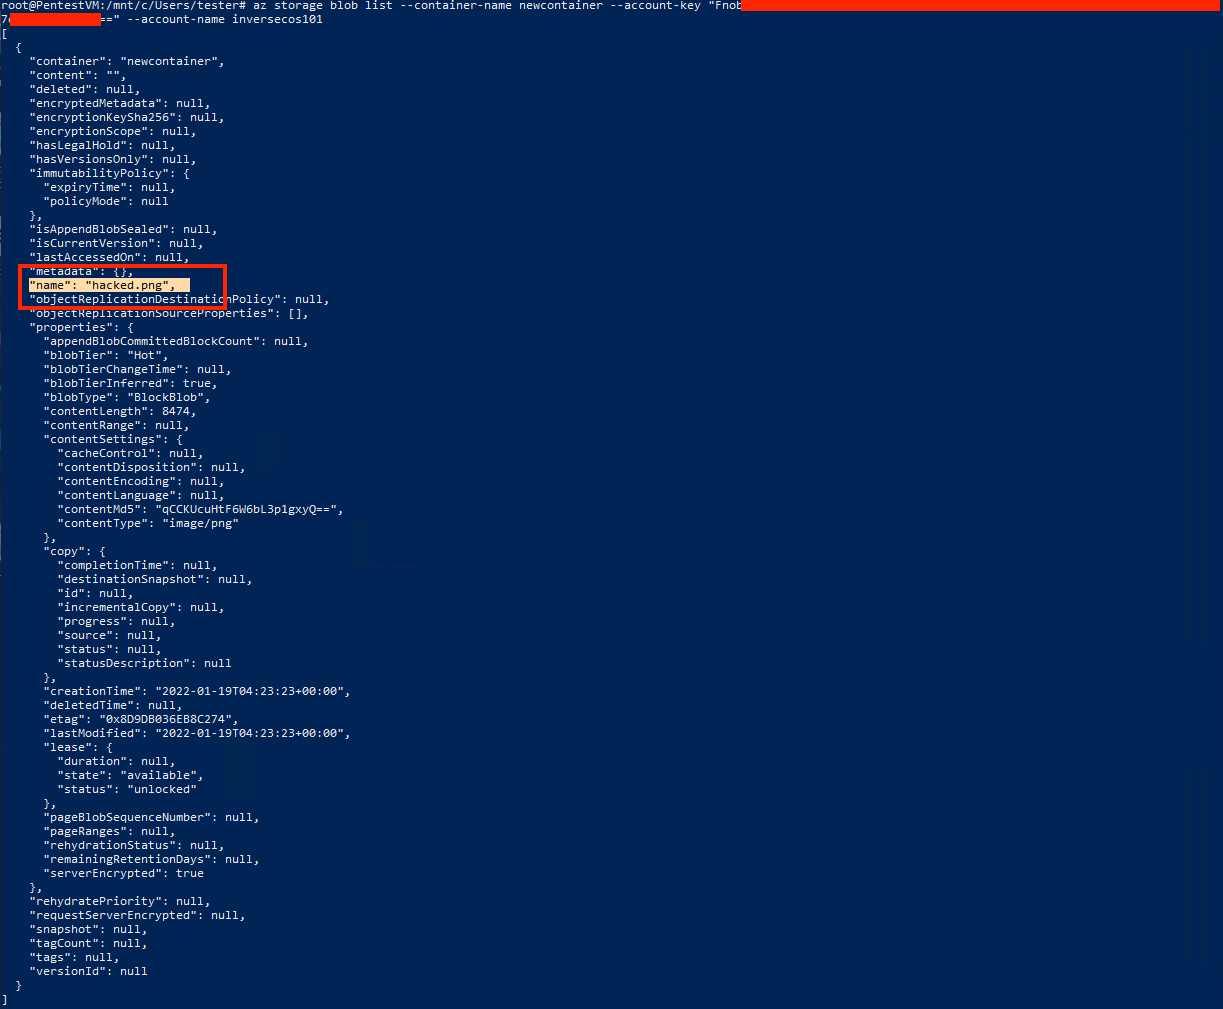
Step 4: Find out the names of files stored in the Container
Due to the permissions set – the attacker cannot download files without knowing their specific names. Given the attacker at this stage has already gained knowledge of the Storage Access Key and the Storage Account Name – this becomes trivial. In the screenshot below, you can see I have enumerated the container “newcontainer” and it has returned information telling me there is a file stored within this container name “hacked.png”.
Step 5: Download files using SAS URI and Azure Storage Explorer
There are many ways you can download the files – but I wanted to show you this method because it means you don’t really need to take the extra steps of figuring out the Container name and the File name. Given at this point you already have the Storage Account Name and the Storage Access Key – you can piece these together directly to access the files.
A “SAS URI” is a Shared Access Signature that allows access to various storage objects. Often, these URIs are accidentally exposed by companies online through public Github pages and other sources that allow indirect access to their storage objects. A SAS URI may take the form of the following taken from the Microsoft docs: https://myaccount.blob.core.windows.net/?restype=service&comp=properties&sv=2019-02-02&ss=bf&srt=s&st=2019-08-01T22%3A18%3A26Z&se=2019-08-10T02%3A23%3A26Z&sr=b&sp=rw&sip=168.1.5.60-168.1.5.70&spr=https&sig=F%6GRVAZ5Cdj2Pw4tgU7IlSTkWgn7bUkkAg8P6HESXwmf%4B
The Microsoft docs gives a really good breakdown on how to interpret this string – but in summary I have highlighted the parameters of note on screen:
- SV – Version of the Storage Service
- SS – What the service can access, in this instance it can access “b” for Blob and “f” for Files (there is also q for Queue, t for Table)
- SRT – What this SAS applies to and in this instance, it applies to service operations
- ST – Start time of the SAS (when it was valid from)
- SE – When the SAS expires
- SP – Operation permissions, in this instance it is “read and write”
- SIP – IP range that it will accept requests from
- SPR – Only allows HTTPs connections
- SIG – Signature
To log in directly – it’s important to fetch the SIG component which can be done using the Azure CLI in my screenshot below.

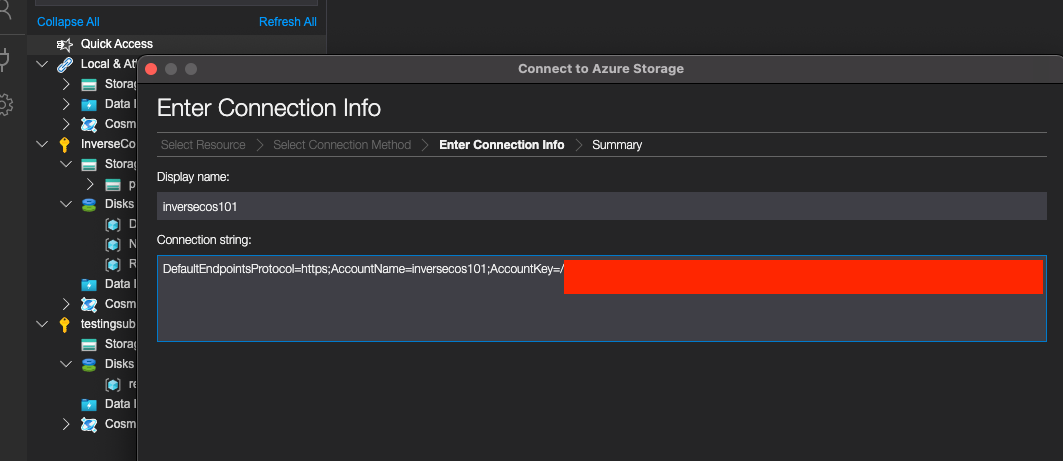
Once you save that SIG URI, you can then open the free Azure Storage Explorer to access the data through a “connection string”.
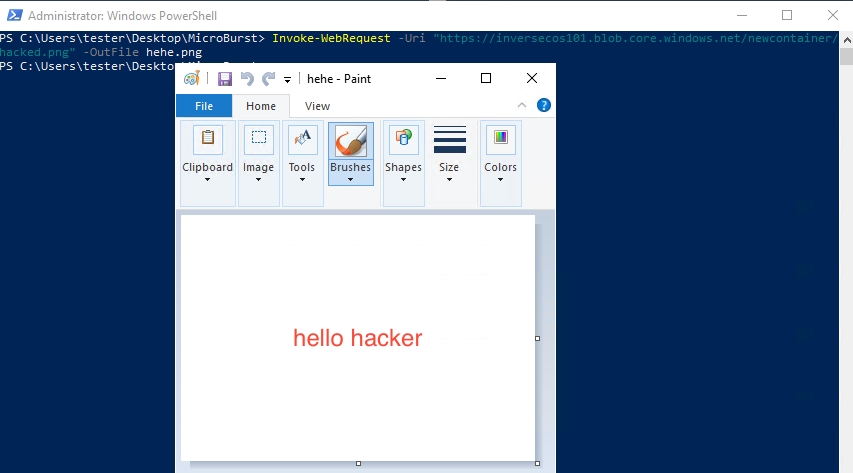
Step 6: Download files using open-source tool like MicroBurst
If you do not want to do step 5, you can also access the file through directly interacting with the service URL. I did this by using the MicroBurst tool made by @KFosaaen below. As you can see here it resulted in the download of my “hacked.png” file.
DETECTION METHODOLOGY
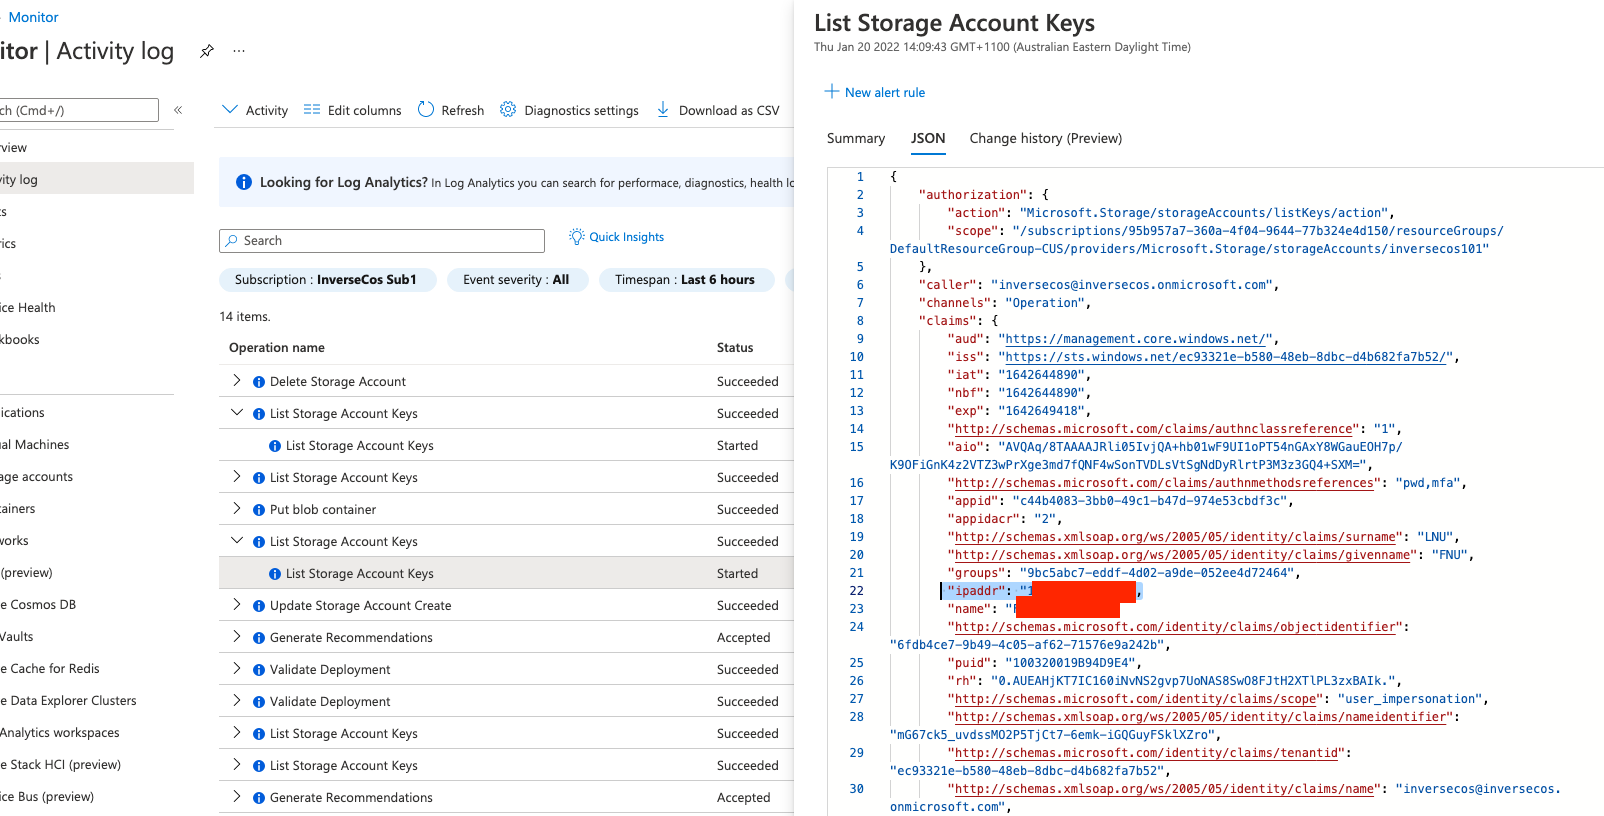
Firstly, the logs pertaining to access and authentication to Azure Storage will not be visible in the Activity Log, nor the Audit Logs. These logs are stored someplace else! To demonstrate this, I have taken a screenshot of my Activity Logs. As you can see in the image blow, it only shows “administrative” related operations such as the creation of the storage account and listing of storage account keys.
This is still interesting data though because if an attacker tries to attain your Storage Key, this will be logged in the Activity Logs!
Step 1: Detect Anomalous Access to Storage Keys
Look for the following operation in the Azure Activity Logs for detecting listing / accessing of the storage keys:
- Operation – List Storage Account Keys
- “ipaddr” Field – Shows remote IP
- Status – Shows if the request was successful or not
- Caller – What user account was utilised to perform this action
Step 2: Access the Storage Analytics Logs
Storage Analytics Logs are where you will see information pertaining to the interesting operations that will elucidate what an attacker did with their access. For example, it will show data such as (but not limited to):
- File Access / Blobs Viewed
- Authentication Events (anonymous or with user accounts)
- Remote IP
- User Agent Strings
To to analyse these logs, you need to locate them. These logs are NOT enabled by default for storage accounts. This of course, will become the frustrating part when you perform incident response on clients. To log these operations, the logging needs to be enabled either through PowerShell or via the Azure Portal.
A quick way to check if these logs are enabled is by going into the Azure Portal and viewing the containers within a Storage Account. If there is a container named “$logs”, then this is likely enabled for the Storage Account. Otherwise, you can just check the settings to figure that out!
To view these logs, I opted to use the Azure Storage Explorer as shown in Step 5 of the Attack Methodology. As you can see, navigating into the “$logs” folder, you have the various log files that exist. You can then export these and analyse the contents.
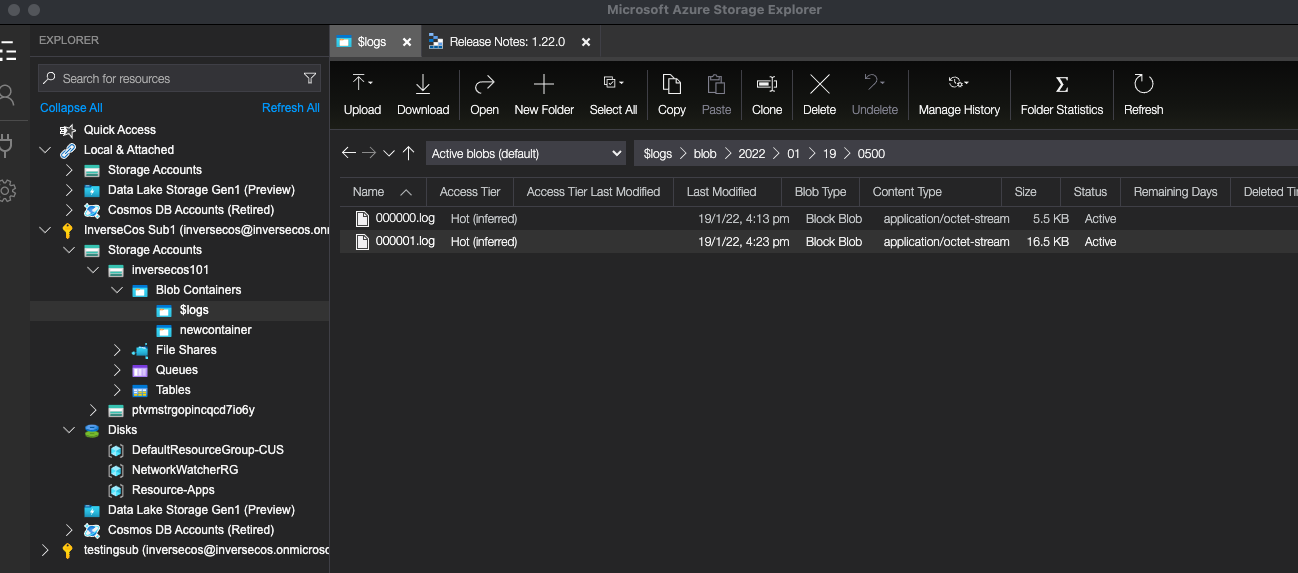
The log files are very typical looking log files – the screenshot below shows what the contents look like.
Step 3: Hunt for File Access
File access will show up in the following pattern in the log files:
- Operation: GetBlob
- Blob: https://<StorageAccount>.blob.core.windows.net/<container>/<filename>
- Status Code: 200 (success)
- Take note also of the user account – depending on the permissions set on the container this may appear as AnonymousSuccess.
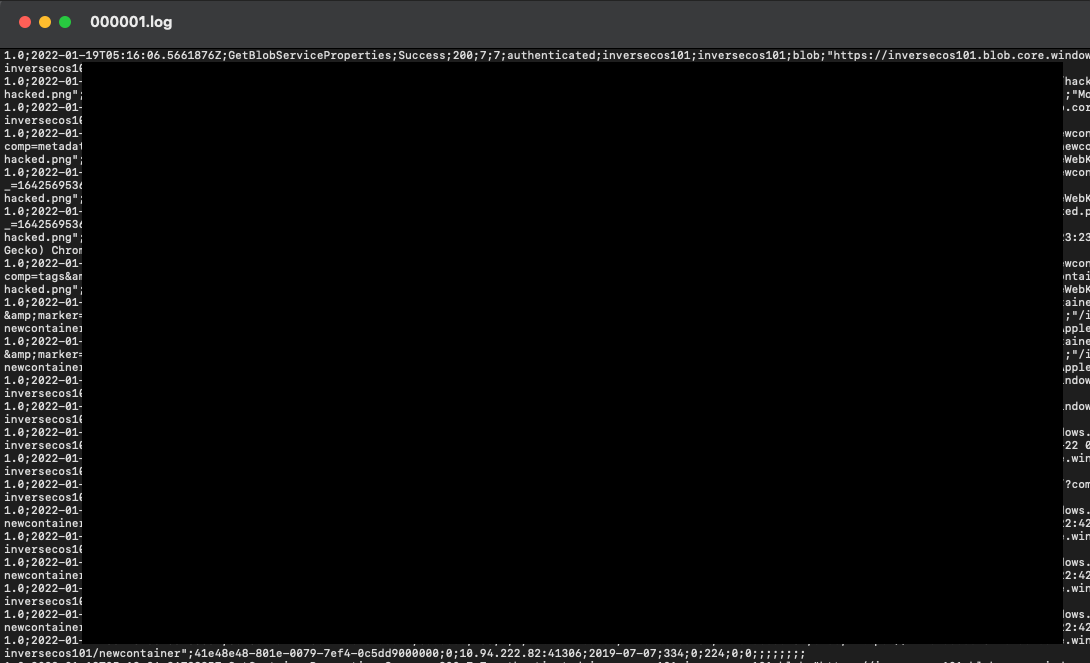
An example of this log where I have viewed the “hacked.png” is shown below:
2022-01-19T05:16:56.5531128Z;GetBlob;AnonymousSuccess;200;55;28;anonymous;;inversecos101;blob;"https://inversecos101.blob.core.windows.net/newcontainer/hacked.png";"/inversecos101/newcontainer/
Step 4: Hunt for Enumeration Activities
As shown in the attack methodology, an attacker may enumerate things like the Container name, blobs under containers and other information. I would take note of the following operations:
- GetContainerProperties
- ListBlobs (Returns a list of blobs under a specified container)
- ListContainers (Returns a list of containers under the account)
- GetAccountInformation
- GetBlobProperties
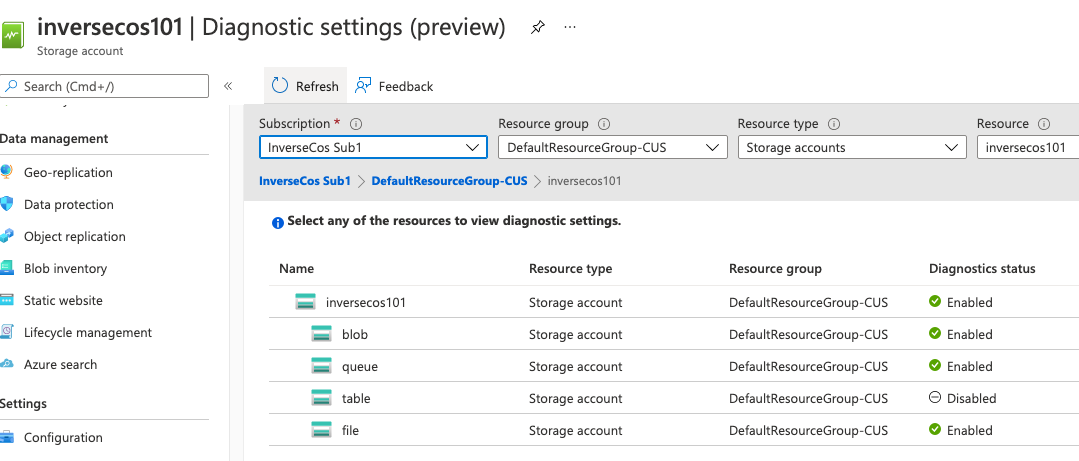
Step 5: Enable Further Logging
I recommend that Diagnostic Settings are enabled as it will add further enrichment to the logs. These settings can be applied in the Azure Portal as seen in the screenshot below. These are DISABLED by default.
When you set up diagnostic settings for each of these services – it will allow you the ability to forward this to a Log Analytics Workspace which is what I have also selected. Of course you can export these logs or set them to archive to a Storage Account as well.
I hope this blog post helps! Happy hunting!!
References:
https://github.com/NetSPI/MicroBurst
https://docs.microsoft.com/en-us/azure/storage/blobs/anonymous-read-access-configure?tabs=portal
https://docs.microsoft.com/en-us/azure/storage/common/storage-introduction
https://docs.microsoft.com/en-us/azure/storage/blobs/storage-blobs-introduction
https://docs.microsoft.com/en-us/azure/storage/common/manage-storage-analytics-logs?tabs=azure-portal
https://docs.microsoft.com/en-us/azure/storage/blobs/storage-blob-user-delegation-sas-create-cli


Comments
Post a Comment