How to build a crypto token in under 10 minutes (ECR-20)


With the rise of Doge and other Ethereum based tokens (NFTs, $UNI, $LINK....) I figure there would be many people wanting to learn how to use Solidity to build their own meme (or non-meme) tokens. This blog post will show you step-by-step how to do this within 10 minutes. 

If you find this content helpful, please feel free to send me some DOGE @ 
DRwU8cc4F5MsC9egz2yKfqCFUQr5VpMQ51. 

What is a token?

Crypto "coins" like Bitcoin (BTC) are generally used as "money" or a unit of value and are stored on the coin-specific blockchain. Tokens are built on these existing blockchains (on top of the Ethereum/Neo/etc blockchain). This blog post will be showing you how to build an Ethereum-based token (ECR-20).

Tokens are most commonly used with a dApp (decentralised application). For example, with Enjin, you can use your tokens to purchase in-game assets on the virtual marketplace. These can be characters, plots of land or assets like trees or other digital assets. NFTs are used to facilitate the transfer of digital asset ownership (i.e. music, art, poetry) to a buyer and is logged on the Ethereum blockchain. Zed Run is another cool NFT-based project where you can purchase virtual horses, breed them, and compete in virtual horse-racing. These horses sell upwards of $250,000 USD. 

The concept of in-game based purchases using fiat (USD, AUD... etc) is not a new concept. Planet Calpso in a virtual video game universe called Entropia was sold for $6,000,000 USD. 


How to build an ECR-20 Token

STEP 1: Create a wallet on Metamask 
We are going to use Metamask for this project as the wallet. I do not recommend Metamask as a wallet. This is just for learning and speed purposes. Metamask is an in-browser based wallet which you can download here.

Once this is set-up you should see the screen that I see below. If you want to build a token that's listed and public... please send ETH to your Metamask wallet at your address on Metamask. If you want to do this as a learning experience, please don't do anything, I will be continuing this on a test network. 


STEP 2: Set the right network
If you are building this for lulz and don't want to actually pay real ETH and publish this, please set the Metamask ETH network to the Rinkeby Test Network. If you are doing this for real and want it published, leave it on the Ethereum Mainnet and make sure you have already transferred ETH to your wallet. It costs money to build a token on the network (as it will also for transfers). 


STEP 3: Get test ETH (If you're doing this for real SKIP this step)
We're going to be building a token that I want to name "WET". For us to do this we need some ETH to deploy the token onto the network. I will be doing this on the test network as I do not want to actually build WET token (lol). 

To do this we need to visit the Rinkey Test Network website to request "fake" test ETH. 
It does not cost that much to deploy a token onto Ethereum. I would just request 3 ETH, or to be honest, whatever you want. What you need to do now is post on Twitter or Facebook with a request and paste this link into the box.

For me, I tweeted the following:

Requesting faucet funds into 0xe93FBA8E62A995DA2E60E7B1aF1FE881d93b4312 on the #Rinkeby #Ethereum test network.


At this point, your wallet should now be funded with fake "ETH". As you can see my wallet below has around 3 ETH loaded now.


STEP 4: Code the Token in Solidity
Now, it's time to get our hands dirty. You need to visit and download the following two solidity files from this Github repo
  • EIP20.sol
  • EIP20Interface.sol
We will be coding and compiling / deploying this code using an Ethereum solidity online compiler here. If you would like to do this offline or using a different method, go ahead.

You need to copy and create two of these solidity files on the online IDE and edit the following section of code commented below where I have changed EIP20 to represent the name of the token I want (which I am calling "WET"). 


The next step is to determine the value of your token i.e. how much is the supply, the name of the token, the symbol (similar to stock ticker) and the amount of decimals. The amount of decimals represents what chunks of ONE token can be traded. For example, if you look at Bitcoin, you don't have to purchase 1 Bitcoin, you can purchase parts of a Bitcoin. If you set the decimal number to "1" it means you cannot divide a token. For this example I have chosen the following values for WET token:

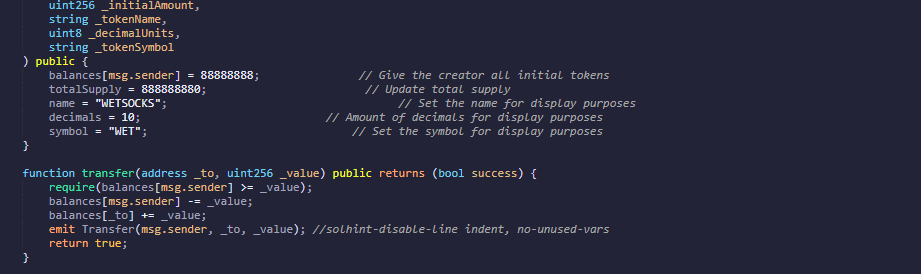
  • Initial Amount (supply): 88888888
  • Total Supply (Initial Amount x Decimals): 888888880
  • Name: "WETSOCKS"
  • Decimals: 10
  • Symbol: "WET"  


STEP 5: Deploy and run
Now it's time to deploy your solidity to the network (mainnet or the test net). You need to set the environment from JavaScript VM to InjectedWeb3 as this will interact with your Metamask wallet directly. Make sure your Metamask wallet is added as an extension on your browser. 

This should pop-up an authentication
 event to your Metamask wallet, which you need to allow. 

The next step is to run and deploy using the IDE by pressing the "deploy" button as pictured below:


This should pop-up a transaction on your Metamask ETH wallet, asking for a deduction of funds. Please confirm this. 


After this is confirmed, you need to now transfer the full amount of your new token into your ETH wallet by transacting on the Solidity IDE. Inside the transfer dropdown you need to paste your wallet address followed by the amount of WET  (the name of your token) you would like. 


This should pop-up another prompt from Metamask to accept the order. When you get here, press "confirm" to receive the tokens into your wallet. 


STEP 6: Verify and add the tokens to your wallet 

Open up Etherscan to verify that the tokens went through from your wallet address. Here in the screenshot you can see that the FROM field is the address of my ETH wallet, and to the TO field is the WET token wallet that was created. You want to copy the "TO" wallet address and add this to your Metamask wallet. 


STEP 7: Enjoy your token 


If you find this content helpful, please feel free to send me some DOGE @ 
DRwU8cc4F5MsC9egz2yKfqCFUQr5VpMQ51. 

You can also reach me on twitter @inversecos. 


Comments

Post a Comment

Popular posts from this blog

Forensic Analysis of AnyDesk Logs

Successful 4624 Anonymous Logons to Windows Server from External IPs?

How to Reverse Engineer and Patch an iOS Application for Beginners: Part I